Ubuntu 18.04 Full Disk Encryption (LUKS) on the Cloud
Author: Paul Sueno
Created: 4/17/2020 // Updated: 8/4/2020
Set up a LUKS encrypted Ubuntu server on the cloud. This is for 18.04 LTS. I chose Ubuntu due to regular updates & strong peer support.
The server needed to be accessible 24/7 with little risk of down-time. I also needed the operating system encrypted and wanted to support alternatives to one of the mega-corporations. These factors led me to choosing Ubuntu via Linode cloud service. Read below for more.
This tutorial is for 18.04 LTS (Bionic Beaver). Ubuntu released a new LTS version in spring 2020 (Focal Fossa 20.04 LTS). Read this blog, if you would rather install Ubuntu 20.04 LTS (Focal Fossa).
Ubuntu and Linode Disclaimer: Ubuntu and the Ubuntu logo are registered trademarks of Canonical Ltd. Linode and the Linode logo are registered trademarks of Linode LLC. This blog references these trademarks as commentary. I am in no way speaking for or on behalf of Canonical or Linode, and I do not imply endorsement by Canonical or Linode.
Cloud or on-site server
Cloud based web services seems like a costly endeavor, but as low as $5 per month it beats paying $2k (or more) up front for a physical server. Another bonus is cloud services generally are on the web all the time. If you set up your server from home, think how many times your internet went down or had to reset the router.
My tutorials will be based on the cloud service I use, Linode. They have a server in my part of the USA, and had all the features I required. But you are more than welcome to use whatever cloud service you want. Others include DigitalOcean, Vultr, Azure, AWS, etc.
Creating a Linode
I started my server with a Linode Nanode at just $5 per month. Since starting out with a Nanode, my server needs have grown larger. Feel free to start there and upgrade if needed. I had to do this, and it wasn't too bad.
Because the operating system will be installed with encryption, the default set ups were inadequate. No worries, I'll walk you through a custom install.
After purchasing your linode, click on it to load up the dashboard. On the menu bar, go all the way to the right and select the "Disks/Configs" tab.
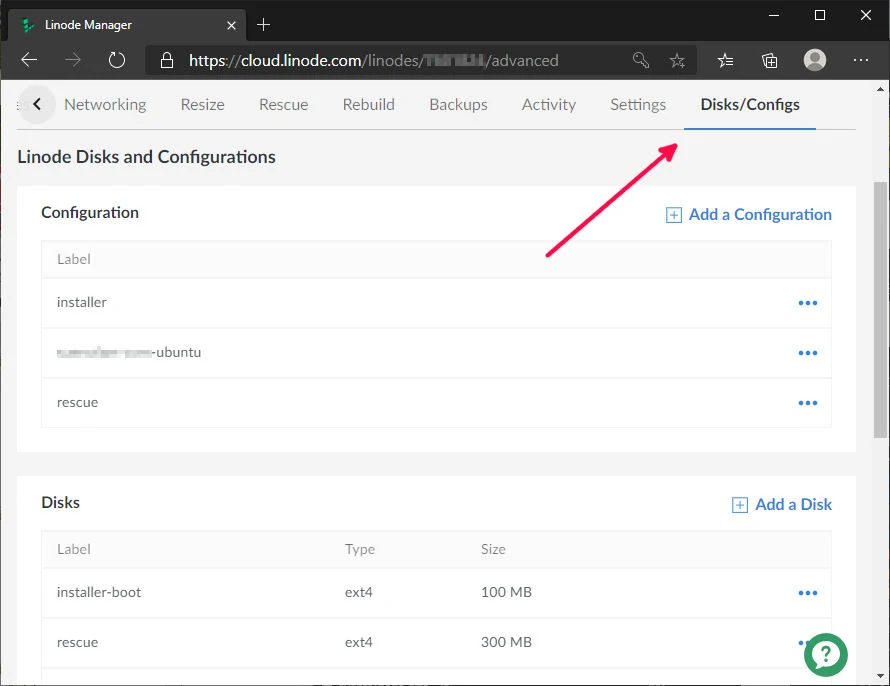
Linode - add disk & boot configs
Firstly, set up the hard drives/disks:
- Installer disk, will have Ubuntu netboot install image loaded
- Rescue disk, will have a rescue boot or live CD/DVD image loaded
- Main system disk, will be the main server disk
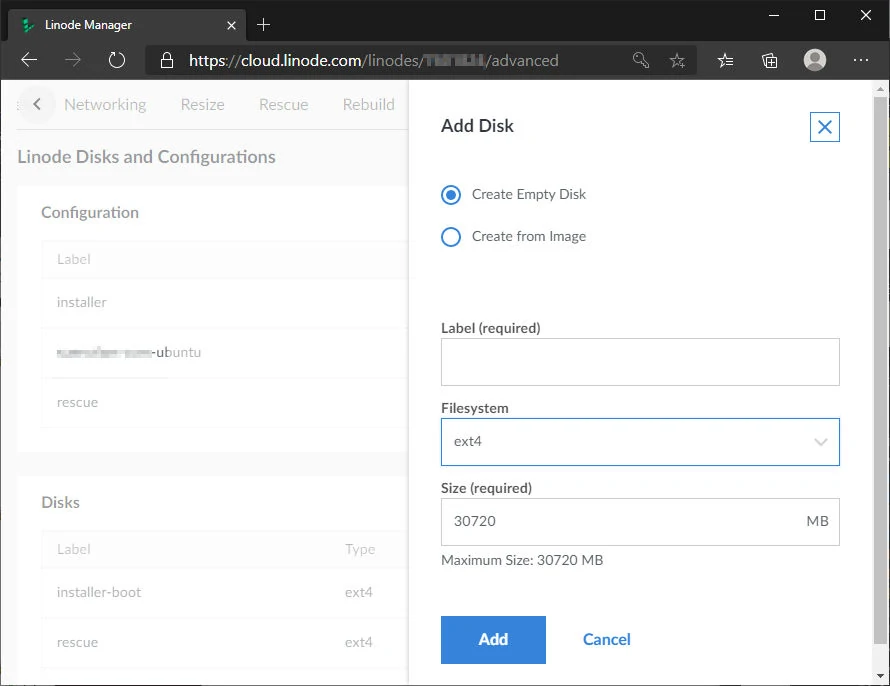
Click on Add a Disk under the Disks section (see image above). You should create three Disks, one for each of the above. Be sure to select Create Empty Disk for each one. Each one will require a label, filesystem and size. We will set up the partitions for the different boot configurations later on.
For the installer, I based the size on how big the "netboot" or network installer for Ubuntu 18 (Bionic). This is the smallest installer, and it will download all the necessary packages after the installer boots up. This is what we want; we don't want to waste precious cloud storage space on GB of installer software we will rarely (if ever) use again. You'll see that the mini.iso (the file we'll download later) is 76MB (as of writing this blog). I rounded up and chose 100 MB for the installer disk.
For the rescue disk, I made my own Debian flavor rescue ISO that was about 200MB. The most popular pre-built live or rescue Linux flavor is Knoppix. The CD iso is about 701 MB. You can skip this part all together if you don't think you need a rescue disk, and rely on Linode's own rescue software. I didn't like their limited packages available, and was not too familiar with Finnix, which is what they use.
The rest of the cloud disk space can be allocated to your main system disk. Below are my settings for each disk. You should modify them to meet your needs.
Installer Disk:
- Create Empty Disk
- Label: installer
- Filesystem: ext4
- Size: 100 MB
Rescue Disk:
- Create Empty Disk
- Label: rescue
- Filesystem: ext4
- Size: 300 MB (yours may be 700+ MB if you use Knoppix CD or whatever)
System Disk:
- Create Empty Disk
- Label: ubuntu
- Filesystem: raw (this is important!)
- Size: use the rest available
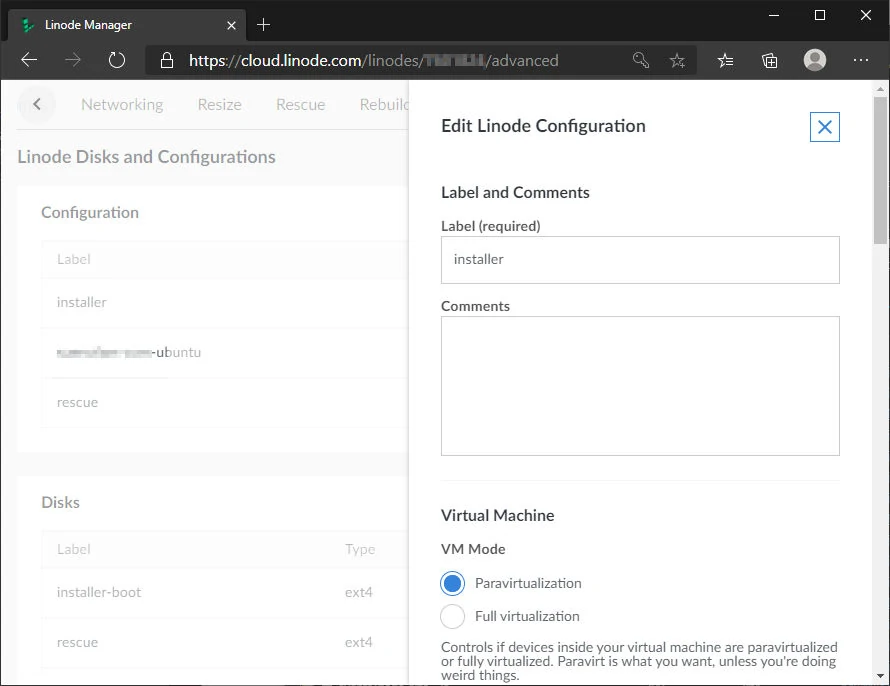
Now it's time to set up the boot configurations. Click on Add a Configuration under the Configuration section. With each configuration, we have to decide which disks should be available and which one to boot from. Similar to the disks, I have three separate boot configurations. One each for installer, rescue and system (Ubuntu) boot configurations. When assigning the disks, we tell the configuration how to reference them via the standard Linux method, e.g., /dev/sda, /dev/sdb and /dev/sdc. Here are the settings for each configuration.
Installer Configuration:
- Label: installer
- VM Mode: Paravirtualization
- Select a Kernel: Direct Disk
- Run Level: Run Default Level
- Memory Limit: Do not set any limits on memory usage
- Block Device Assignment
- /dev/sda: ubuntu (disk)
- /dev/sdb: installer (disk)
- Use Custom Root: off
- Root Device: /dev/sdb
- Filesystem/Boot Helpers: all off
Rescue Configuration:
- Label: rescue
- VM Mode, Kernel, Run Level and Memory: same as above
- Block Device Assignment
- /dev/sda: ubuntu (disk)
- /dev/sdb: rescue (disk)
- /dev/sdc: installer (disk)
- Use Custom Root: off
- Root Device: /dev/sdb
- Filesystem/Boot Helpers: all off
Ubuntu (system) Configuration:
- Label: ubuntu
- VM Mode, Kernel, Run Level and Memory: same as above
- Block Device Assignment
- /dev/sda: ubuntu (disk)
- Use Custom Root: off
- Root Device: /dev/sda
- Filesystem/Boot Helpers: all off
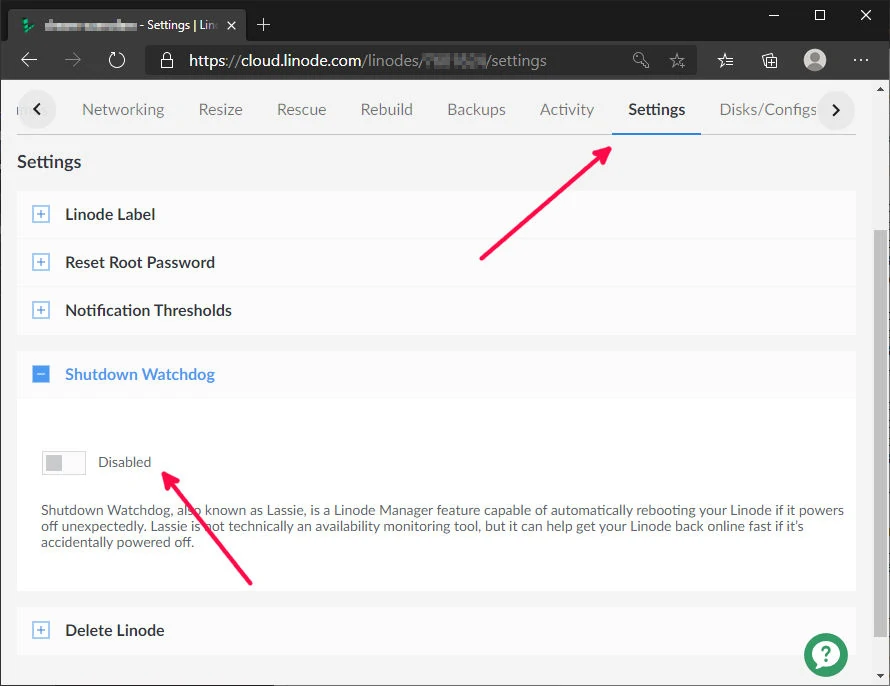
Linode - other settings
Because we are installing our own custom Ubuntu system, the built-in Linode tools may break our system. On the main dashboard, click on "Settings" tab. There, expancd Shutdown Watchdog and make sure it is Disabled.
Download Ubuntu and rescue ISO
I know we set up our three boot configurations already. But to get the Ubuntu netboot installer and custom (or Knoppix or other) rescue ISO downloaded, we have to load a one-time "rescue". This is different than the rescue above. Sorry about the naming confusion. Click on "Rescue" tab from the Dashboard.
Set up the following block device assignments:
- /dev/sda: installer
- /dev/sdb: rescue
- /dev/sdc: ubuntu (optional)
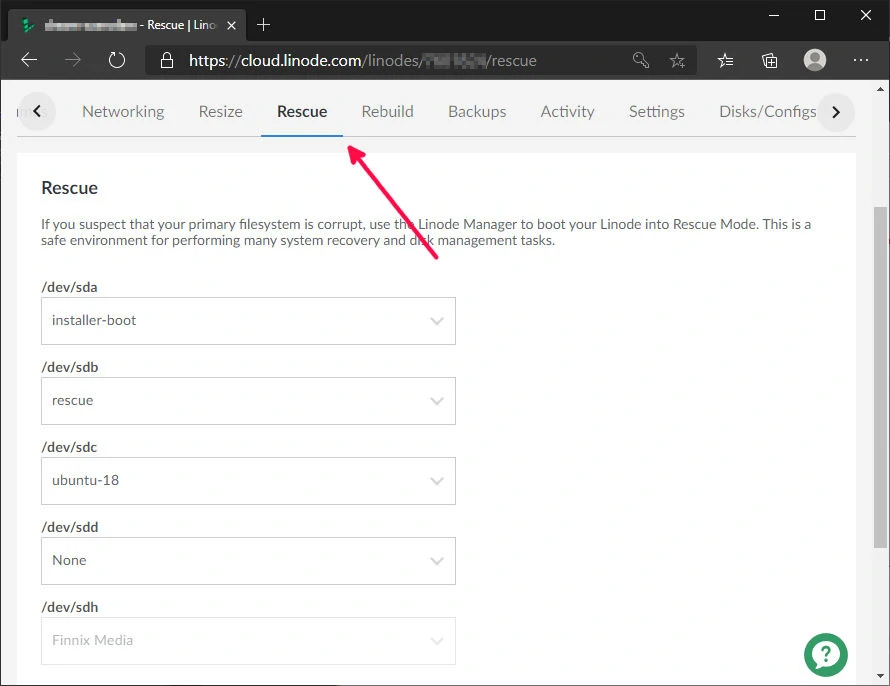
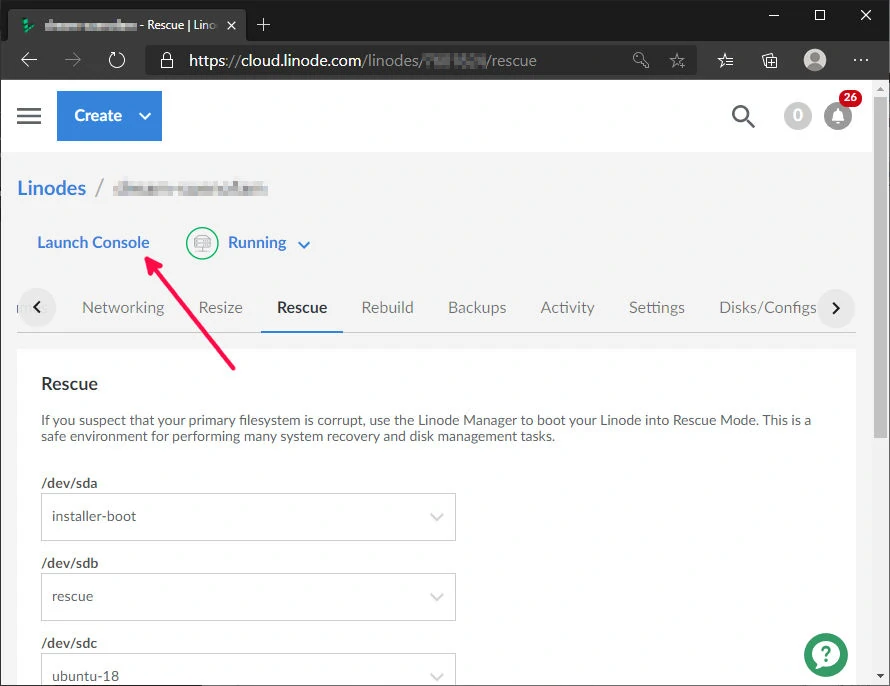
Click "Reboot into Rescue Mode". After Rescue Mode boots, be sure it says Running above the menu tabs. Then click on "Launch Console" right beside where it says Running. This will load a pop-up that gives us access to the disks we selected above for this one-time rescue boot. We will stay in the Weblish tab.
In the Weblish console, you should see some basic boot status lines and a Welcome to Finnix! line. We are now using Linux, woo hoo!! If you want to confirm you have the right disks assigned, type in lsblk at the root # prompt.
For the rescue ISO, I saved the file onto a webserver I already had set up. You can either download the Knoppix ftp link directly, or use your own. Let me explain the four lines below. The first line downloads the Ubuntu netboot installer as an ISO file. The second line takes the image of the ISO file as the if= (or in file) and clones it to an out file as the actual files. The of= or out file is the installer device block we assigned to /dev/sda.
In other words, we download the installer ISO. The files stored in the installer ISO will then be copied to the installer disk in a bootable format.
A similar process is done for the rescue ISO and disk. Be sure to replace appropriate text inside the square brackets [ ]. Type in the following lines in the command line.
wget http://archive.ubuntu.com/ubuntu/dists/bionic-updates/main/installer-amd64/current/images/netboot/mini.iso
dd if=mini.iso of=/dev/sda
wget http://[Knoppix or your own hyperlink to rescue ISO]
dd if=[rescue ISO file] of=/dev/sdb
Install Ubuntu 18 (Bionic)
Now we're ready to install Ubuntu. Go back to the Linode dashboard, and click "Disks/Configs" tab. Under the Configuration section, click on the three-dots ... to the right of installer. Then click "Boot this Config".
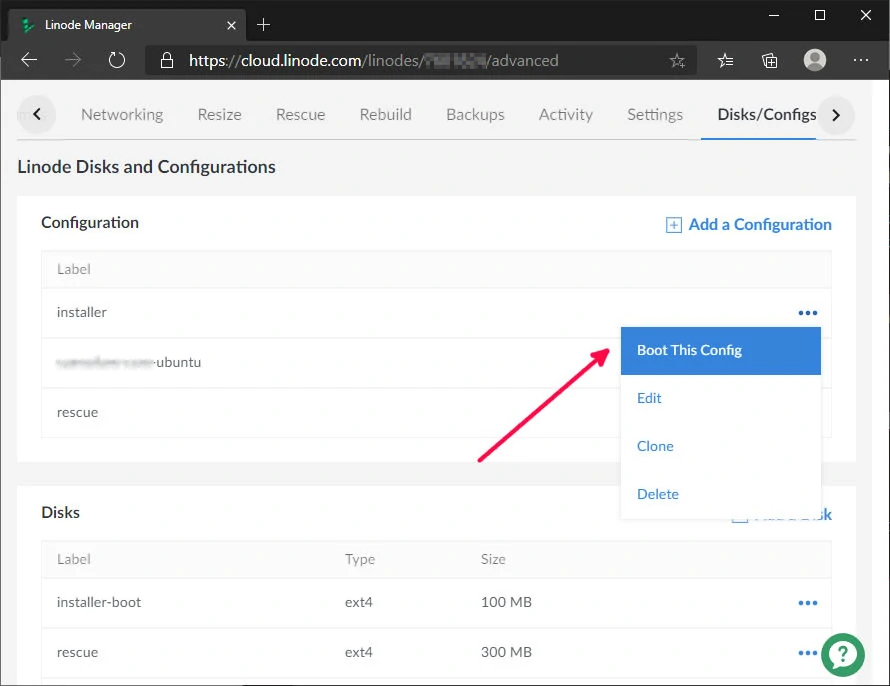
Be sure the installer configuration has finished booting and has a status of "Running". Now click on "Launch Console" as above. With the pop-up window, click on Glish to start the Ubuntu install. Click on the install screen window, and press Enter to select and proceed with Install.

The first few screens will guide you through the keyboard. I use the default recommendations (standard English US), and probably what you want as well. The installer will then make sure the internet is available and start downloading a few packages.
Next up enter a hostname. This is what your server will be known in your network (even if it's just a network of 1 server). But if you have a domain registered, you can tie this server with that domain and identify the server with the hostname. This can be changed later on. The next screens help the installer find the closest Ubuntu mirrors to download the packages from. The defaults are fine, if you're in the USA. Unless you know you are behind a proxy, leave the HTTP proxy information blank. More packages will be downloaded. Then the installer gets information about you: name, username and password. The installer guesses where your timezone is. Change it if needed, but be sure it is set up in the timezone you want. Next up are steps to encrypt the whole system.
Encrypt - LVM - partition disks
You should be at the screen asking you to [!!] Partition disks. This is where all the magic is done to set up whole-system LUKS encryption (which is based on dm-crypt). We will be encrypting the main system device block, and under that layer of encryption will set up logical volum management (LVM) file systems.
This tutorial will guide you through the Manual set up of encryption, LVM and file system partitioning. I had to do this for setting up minimum requirements for one of the programs I wanted running. If you want to just start out with a basic system encrypted Ubuntu server, feel free to select Guided - use entire disk and set up encrypted LVM. You can join back on the tutorial at the appropriate step. For the rest, go ahead and arrow down to Manual and press Enter.
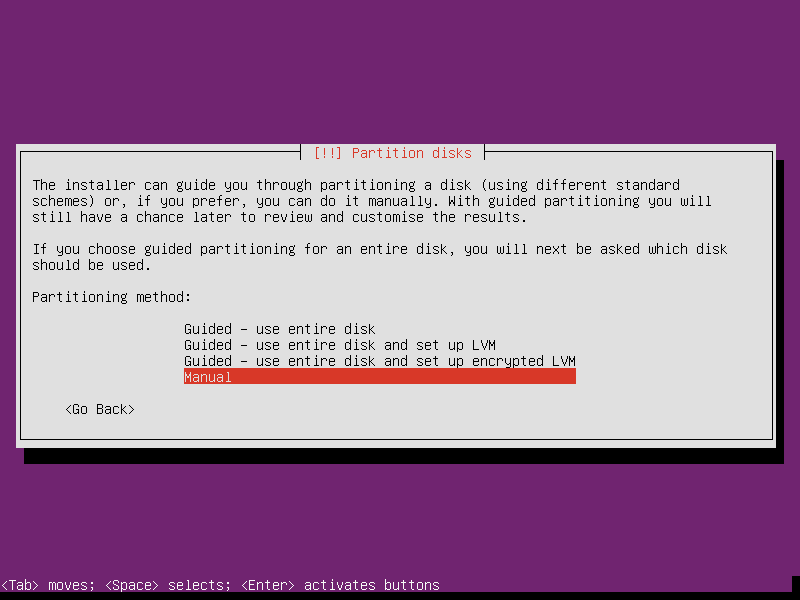
If you set up the device block settings correctly, then SCSI1 or sda should be the system (Ubuntu) disk. You can verify because it is much bigger than SCSI2 or sdb. Select SCSI1 (device block with the largest size), and hit enter. Select Yes to confirm creating a new empty partition table. Now select pri/log [size] FREE SPACE just under the SCSI line selected above. You'll move onto the next screen.

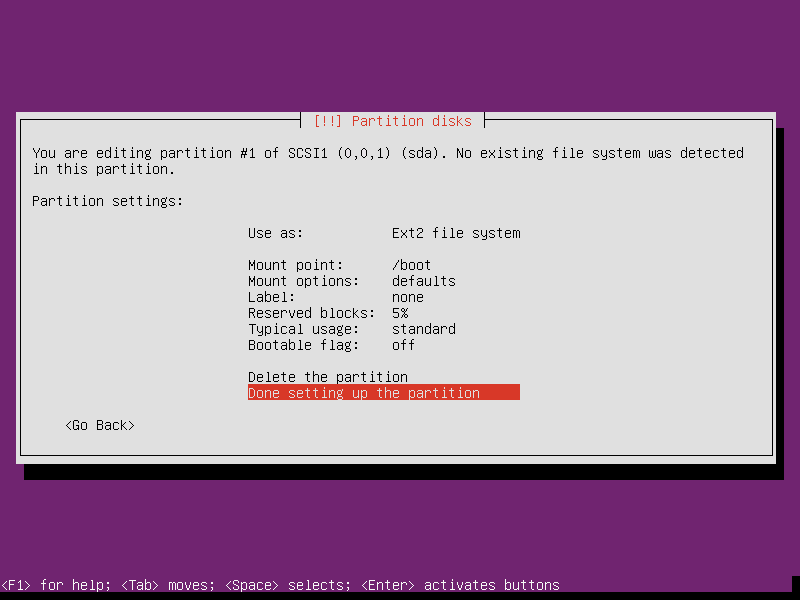
Create boot partition first.
- Select
Create a new partition - New partition size: 1GB
- Type: Primary
- Location: Beginning
- Use as: Ext 2 file system
- Mount point: /boot
- OK to leave all other options as is
- Select
Done setting up the partition
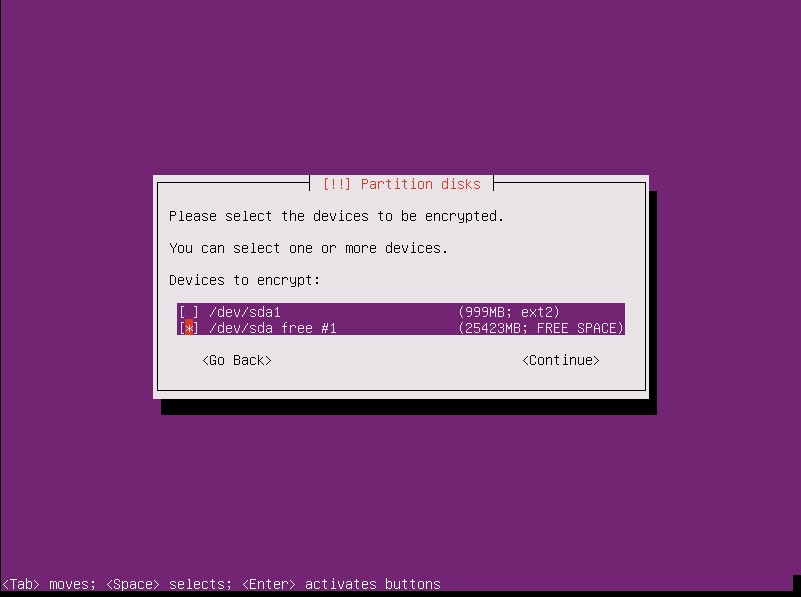
Create encrypted volume.
- Move arrow up and select
Configure encrypted volumes - Write changes and configure encrypted volumes? Yes
- Select
Create encrypted volumes - Move arrow down to
/dev/sda free #1(make sure this is largest available) - Press spacebar and enter to select
- OK to use default LUKS settings
- Select
Done setting up the partition - Write changes and configure encrypted volumes? Yes
- Select
Finish - Enter your
Encryption passphrase. WRITE THIS DOWN AND SAVE IT SOMEWHERE SAFE!
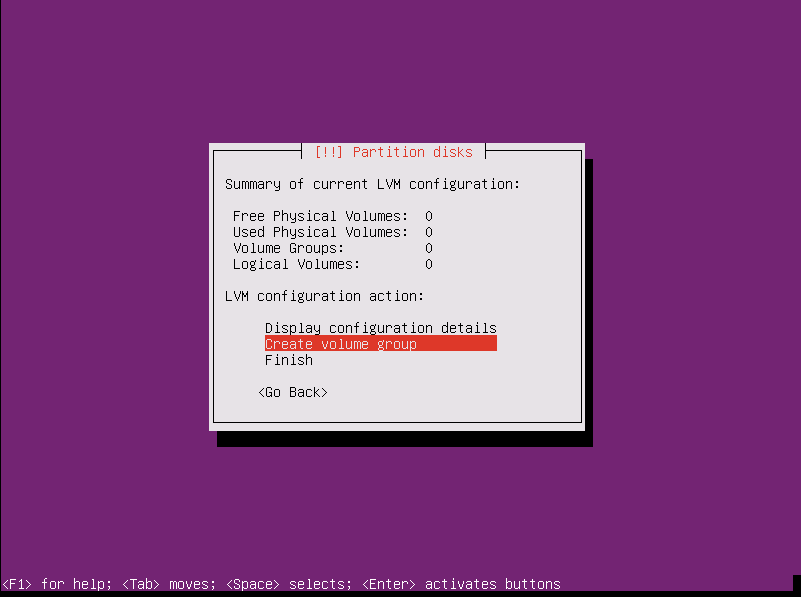
Create LVM volume group and logical volumes
- Move arrow up and select
Configure the Logical Volume Manager - Write changes and configure encrypted volumes? Yes
- Move arrow down and select
Create volume group- Remember the hostname you entered before? Use that here. Replace
hostwith your own. - I entered:
host-vg
- Remember the hostname you entered before? Use that here. Replace
- Select the encrypted partition. It should read
/dev/mapper/sda5_crypt - Select
Create logical volume- Select
host-vg(or whatever volume group name you created above) - Name: root
- Select
- Logical volume size:
- I had to create a swap space that was 4GB. You can create one much smaller (maybe 1GB).
- The size you enter here is the available less 4000MB (or less 1000MB)
- Select
Create logical volume- Select
host-vg(or whatever volume group name you created above) - Name: swap
- Select
- Logical volume size: use the rest of the volume (should match the number above)
- Select
Finish
Set up the logical volume partitions
- Create root
/partition- Move arrow down and select
#1just belowLVM VG host-vg, LV root - Use as: btrfs (you can use any file system you choose, the standard is ext4)
- Mount point:
/ - the root file system - OK to leave all other options as is
- Select
Done setting up the partition
- Move arrow down and select
- Create to swap partition
- Select
#1just belowLVM VG host-vg, LV swap - Use as: swap area
- Select
Done setting up the partition
- Select
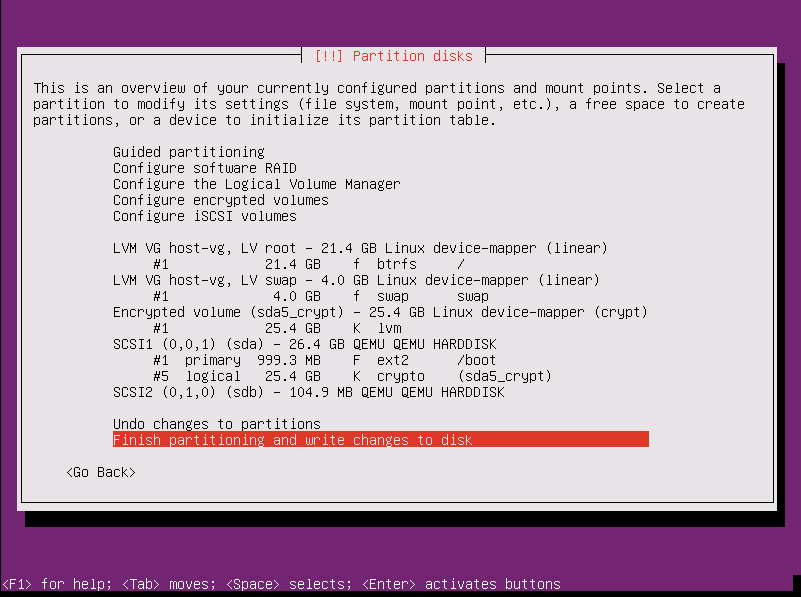
- Before finalizing the partition scheme, verify your screen looks like mine.
- Under
SCSI1, there should be/bootand(sda5_crypt)or similar partitions - Under
Encrypted volume (sda5_crypt), it should readlvm - Under each logical volume or
LV, it should read (respectively)btrfs /swap swap
- Under
- Select
Finish partitioning and write changes to disk - Write changes and configure encrypted volumes? Yes
Complete Ubuntu install
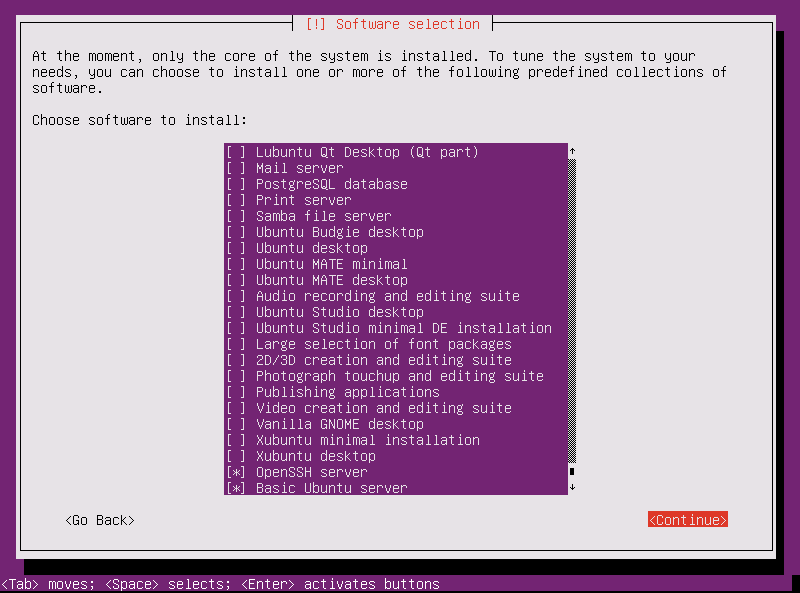
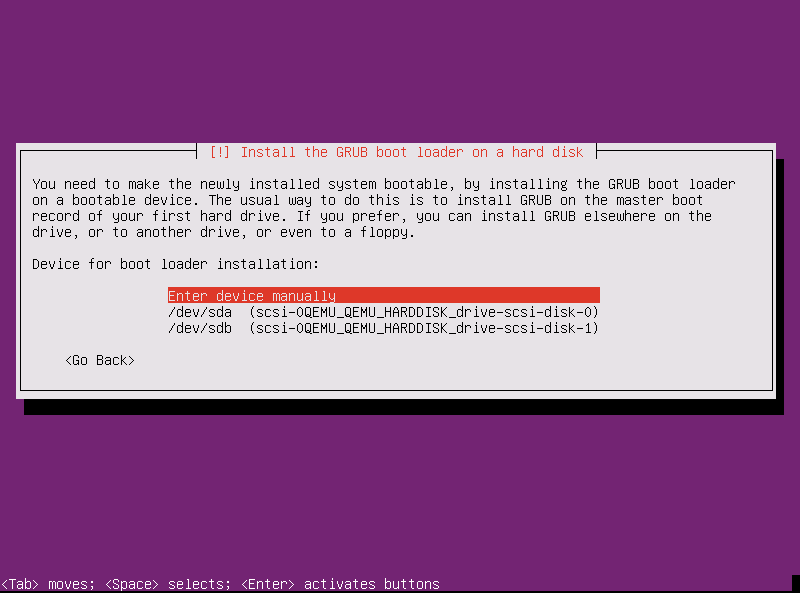
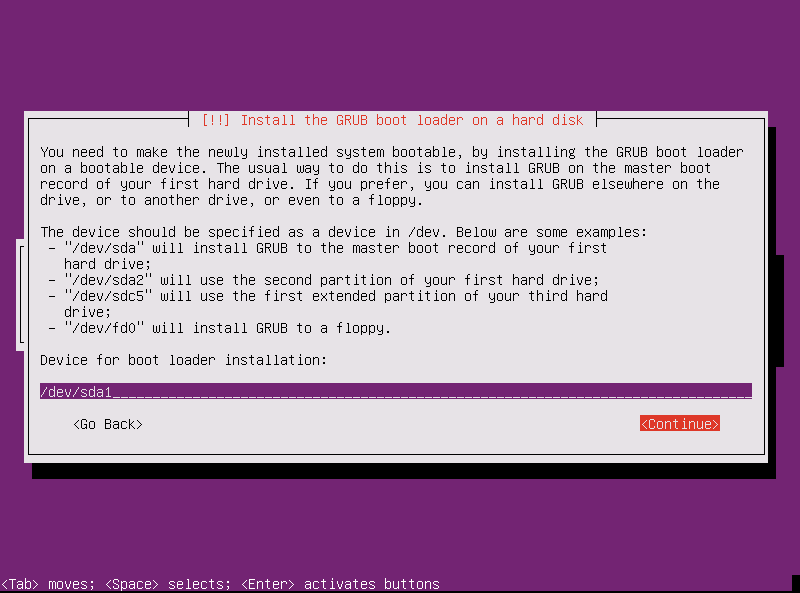
I want to update my own system manually. Automatic updates are likely to break my system. And so I picked No automatic updates. To keep a lean machine, I didn't want any bloatware. The only software I installed at this point were OpenSSH server and Basic Ubuntu server (scroll to the bottom of that install screen). Be sure to select Yes when asked about GRUB boot loader. Most importantly, when asked to select Device for boot loader installation: you must select Enter device manually. Type in /dev/sda1. If you followed along, this partition should correspond to /boot above. Select Yes when asked about system clock and UTC. Now it's time to shutdown the installer boot configuration and select Continue. Now close the Glish window.
Ubuntu inital boot
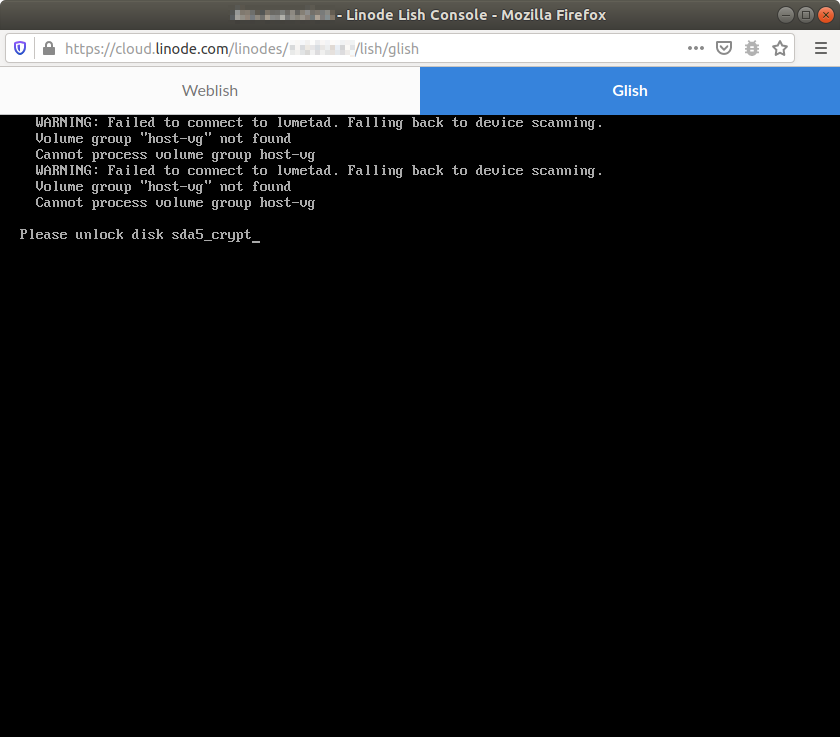
Go back to the Linode dashboard. Click on "Disks/Configs" menu tab on the right. Under Configuration, go to the ... to the right of ubuntu. Click on Boot This Config. Once the Linode is "Running", click on Launch Console up top. Click on Glish. You should see the window below (sometimes it renders differently). You may need to hit a few arrows to have the text pop up. Type in the LUKS password you created earlier and wrote down to keep safe. If you forget this password, lose the written down copy and the server is reset; you're pretty much screwed. You have been warned.
You can now log in with the user credentials you created earlier. The sudo command allows you root privileges. Let's also update the apt repositories. After logging in, type in sudo apt update. For most of the file modifications below, I use nano text editor.
If you have a domain name you own, think of a hostname to use for this server. Examples may include imap, smtp, mail, www, etc. I picked a random word for mine. As you recall, I chose host as my host name for this tutorial. The hostname can be modified via sudo nano /etc/hostname. To save Ctrl-o, to exit Ctrl-x.
Let's get the default server settings given to us by Linode's DHCP server. Type in ifconfig. The network device is in the format enp0sn (where n is a number). The ipv4 is inet and ipv6 are inet6. The one we want (what I'll refer to as [ipv6]) is the one that does not start with fe80:.
Now it's time to allow us to identify ourselves to the world wide web. For this to actually work, you will also need to create A/AAAA DNS records with your domain registrar (beyond scope of this tutorial, just Bing it). Let's back up the hosts file and then edit it.
sudo cp /etc/hosts /etc/hosts.bak
sudo nano /etc/hosts
Comment out the line with the specific address 127.0.1.1 ... by adding a pound sign to it. It should look like #127.0.1.1 .... Be sure to keep the loop back devices as is for both ipv4 and ipv6. Add the Linode server's ip addresses from above (replace yours without the square brackets) and place your own host and domain names (do not use my example host.domain.com).
[ipv4] host.domain.com host
[ipv6] host.domain.com host
The hosts file should look something like this (be sure to replace with your own info).
127.0.0.1  localhost
#127.0.1.1 host.members.linode.com host
[ipv4]     host.domain.com host

# The following lines are desirable for IPv6 capable hosts
::1     localhost ip6-localhost ip6-loopback
ff02::1 ip6-allnodes
ff02::2 ip6-allrouters
[ipv6]  host.domain.com host
Harden server SSH
The Glish interface is wonderful for what it's for, but it is cumbersome. I like ssh'ing into the server via a terminal.
I'll assume the only person you want logging in is you. Type in the command to make a backup of the original ssh configuration file.
sudo cp /etc/ssh/sshd_config /etc/ssh/sshd_config.bak
sudo nano /etc/ssh/sshd_config
In the nano editor, add the following lines to the top. For [username] type in your own username.
PasswordAuthentication yes
AllowUsers [username]
PubkeyAuthentication yes
PermitRootLogin no
Now that the ssh server daemon knows only you have access, let's restart the service. After typing in exit below, make sure Glish is back to the login screen. You can close the window afterwards.
sudo service ssh restart
exit
Now let's talk about ssh tunnels, and some basic terminaology. An ssh tunnel allows secure encrypted access between two computers. How we will use it is a local (think laptop or desktop workstation) and remote (or Linode server) ssh connection. One way to get access is by supplying a username and password. But a better method is by creating a secure key on the local machine, and then saving the public key on the remote server.
To create an ssh key, there are two basic methods I use: (1) Linux way and (2) Windows way. The Windows way is through the Putty and its keygen programs. I leave it to you to explore this option yourself.
For the Linux way, make sure you are on your local (laptop or desktop) device. At your $ command prompt, type ssh-keygen. You can use the default name or type in your own, but make sure it is saved in your /home/[username]/.ssh/ directory. I use the default settings and save a password. The password is optional. I will assume you didn't change the default name, and a key-pair named id_rsa was created. If you will be doing ssh to multiple remote servers/hosts, then I recommend creating a unique name for each.
Now we need to get the key we just created for the local machine readable to the remote (Linux server) host. A simple way to do this is by using the ipv4 address from above. Use the command at your local device $ prompt: ssh-copy-id [username]@[ipv4]. Be sure to substitute your username and ipv4 inside the square brackets. Alternatively, you can copy the contents of the local /home/[username]/.ssh/id_rsa.pub (via nano or cat) and paste it in the remote (Linode server) /home/[username]/.ssh/authorized_keys.
Here are commands to get from local device to remote server via ssh. The usual Linux format for the command prompt is shown. Only type in commands to the right of the $ prompt. Initially it will ask to save the remote key fingerprint locally. Allow this to happen. You will also login via username and password (will change this later). I also showed the commands to create the authorized_keys file. If you copied the pulbic key via ssh-copy-id, then you shouldn't have to create the authorized_keys file. If you did have to create the file, the last two lines are essential. Otherwise, ssh won't work.
[username]@local$ ssh [username]@[ipv4]
[username]@remote$ mkdir /home/[username]/.ssh
[username]@remote$ touch /home/[username]/.ssh/authorized_keys
[username]@remote$ chmod 700 /home/[username]/.ssh
[username]@remote$ chmod 600 /home/[username]/.ssh/authorized_keys
Now that the key-pair has been created and saved on both local device and remote server, let's only allow logging in via keys. This will prevent people from "guessing" or brute-force attacking your server via ssh. Be sure your terminal has an active ssh connection to your Linode server. Edit the ssh server configuration file on the server: sudo nano /etc/ssh/sshd_config. Modify the file with the below lines at the top of the file. Note that PasswordAuthentication is set to no.
PasswordAuthentication no
AllowUsers [username]
PubkeyAuthentication yes
PermitRootLogin no
Harden server firewall
I don't use the default ufw. Instead, I prefer the granular controlability allowed with iptables. The basic template of my iptables is based on the github examples by @jirutka.
The following steps will turn off and disable ufw. Then download a service that allows the iptables rules be saved and reloaded correctly, when the server is reboot or shutdown. OK to save current iptables when prompted.
sudo service ufw stop
sudo systemctl disable ufw.service
sudo apt install iptables-persistent
Copy-paste the iptables rules by @jirutka to a text editor. Modify any lines that you may want. If you don't need ipv6, then turn it off in Ubuntu. Look into this tutorial by linuxbabe. Now copy-paste these modified rules files to /etc/iptables/rules.v4 and /etc/iptables/rules.v6 (if using ipv6). In case you happen to use the command sudo iptables-save, make sure you save the formatted rules files. That way you have them as reference. Otherwise, the command saves the iptables without any formatting.
sudo cp /etc/iptables/rules.v4 /etc/iptables/rules.v4.formatted
sudo cp /etc/iptables/rules.v6 /etc/iptables/rules.v6.formatted
Another program to consider is Fail2Ban. This program reviews common server and system log files to see if there are bad actors trying to access your server. If the bad actor rules are met, Fail2Ban temporarily blocks their ip address via iptables.
You have a fully encrypted, secure Ubuntu server. There's so much you can do with this, like building a web app platform, creating an email server and setting up a DNS server.
- LEMP Stack (modified) with Ubuntu, Nginx, PostgreSQL and PHP.
- Caching DNS server via Bind9
- Private document server and productivity suite based on Nextcloud and OnlyOffice
- PostgreSQL in LEMP Stack and Ubuntu 20.04
- Nextcloud and OnlyOffice on Ubuntu 18.04 LTS
- Install LEMP Stack on Ubuntu 18.04 LTS