Install LEMP Stack on Ubuntu 18.04 LTS
Author: Paul Sueno
Created: 4/19/2020 // Updated: 7/25/2020
Set up a modified LEMP stack on Ubuntu 18.04. The modified is using PostgreSQL rather than MariaDB/MySQL. This blog is Part 1 of 2.
What is LEMP? It's a common way to implement a web service. Hosting web sites alone won't get you too far without a database and way to process the data. There are four essential aspects: the operating system, web server, database and server side scripting. This is where an LEMP stack comes in. It's the combination of Linux, (E)Nginx, MySQL (or similar database) and PHP scripting.
This blog will focus on setting up Nginx with TLS/SSL encryption by Let's Encrypt (Certbot). Most online tutorials showed LEMP stacks with Mariadb or MySQL. One of the web apps I needed to run required PostgreSQL. I'm going to start with the web server here. A separate blog will cover incorporating SQL and PHP into my LEMP (or LEPP?) stacks.
Nginx and Ubuntu
As open source web servers go, Nginx (pronounced "Engine X") is a very popular alternative to Apache. The ServerGuy wrote a great comparison between the two. Do note that Nginx is open source and availabe free. Top search results for Nginx return the paid-support product, which I do not use. If you decide to stick with the free open source Nginx, follow along.
The web server must be installed on an operating system. This tutorial will be based on Nginx version 1.14.0 on Ubuntu 18.04 LTS. If you haven't done so already, go ahead and set up an Ubuntu server. See my tutorial on setting up a LUKS encrypted Ubuntu server on the cloud. Come back here afterwards.
Go ahead and ssh or Putty into your server. And let's begin!
Install by package manager
As you may know, installing applications and programs on Ubuntu (or any other Linux flavor) are much easier through a package manager. The most commonly used one for Ubuntu is apt.
Make sure the package repositories are updated. As long as no other essential services are running, go ahead and upgrade the server as well. Once your server has a handful of essential services configured and running, I recommend frequent backups. Be careful of upgrades. And if a service doesn't run quite right after a system upgrade, you may want to rollback from one of the backups. Here are the commands to update and upgrade by apt.
sudo apt update
sudo apt upgrade
I installed Nginx along with the extras package.
sudo apt install nginx nginx-extrasInitial Nginx configuration
The basic configuration files for Nginx are found in /etc/nginx/. I scour the web regularly for help with customizing my server. Nginx put together a good intro site for use of their server. Because I host my apps on Linode, here's their intro to using Nginx.
I host several apps on one host with one ip address. I take advantage of Nginx's name-based virtual hosting via their server_name directive. I created separate .conf configuration files for each site/app. These are located in /etc/nginx/sites-available/ and symbolically linked to /etc/nginx/sites-enabled/. These files tell the server how to handle http(s) requests.
The files that are to be hosted and shared on the web are located in /usr/share/nginx/ folder. I also create symbolic links from my hosted app folders to here. So remember, the configuration files are located in /etc/nginx/, while the hosted files should be located in /usr/share/nginx/. Some people who are used to Apache's default, have the hosted directories located in /var/www/html/. Use whichever you want. Be consistent. But I'll be using the former.
Let's back up the initial install files, in case we mess up. After backing up, I'll delete the default configuration file and create my own.
sudo cp /etc/nginx/nginx.conf /etc/nginx/nginx.conf.orig
sudo cp /etc/nginx/sites-available/default /etc/nginx/sites-available/default.orig
sudo rm /etc/nginx/sites-enabled/default
sudo cp /usr/share/nginx/html/index.html /usr/share/nginx/html/index.html.orig
To help with the configuration, let's also get your network address. Get this by the command ifconfig. Look for the addresses listed by your public-facing or wide-area-network (WAN) interface. My WAN interface device is named enp0sn (where n is a number). The ipv4 address is noted next to inet. Use the ipv6 next to inet6 that does not start with fe80:. If you have it, the address that starts with fe80: is called link-local and used to identify and manage the network. Here's a great explanation by dotcom-tools.
Something else you need (beyond the scope of this tutorial) is to set up your domain registrar to point requests to your site over to your server. You will need to create A/AAAA records in your DNS. Domain name registrar services are a dime-a-dozen out there. I separated my web server from my domain name registrar. Many reasons to do this, but some reasons to keep them all in one. Read Nuts and Bolts Blog for more info on this topic.
Enter this command to create our own default Nginx configuration file: sudo nano /etc/nginx/conf.d/default.conf. Here's an example of my file. You will need your own ip addresses and host.domain.com as registered in your DNS (see above discussion). Search for keywords in the Nginx documentation for guidance on the configuration files. Let's start it off with a site for unencrypted connections only. Remember to replace your own host/domain names and ip addresses!!
server {
  listen 80;
  listen [::]:80;
  server_name host.domain.com domain.com xxx.xxx.xxx.xxx [ffff:eeee:dddd::1234];
  root /usr/share/nginx/html;
  index index.php index.html;
  location / {
    try_files $uri $uri/ /index.html =404;
  }
}
Modify iptables firewall
If you followed along after my Ubuntu install tutorial, your firewall should be barebones via iptables with ufw disabled. We need to allow traffic to our http(s) ports. These are ports 80 (http) for unencrypted traffic and 443 (https) for TLS/SSL encrypted traffic. I will say this once, but please be mindful for your own configuration. I disabled ipv6 on my system. If you choose to keep ipv6 up, then make sure you do all the steps below not only for ipv4 (which I will show you). But you have to also do it for ipv6. You'll have to look into how to do it yourself, though it's really not much different than for ipv4.
With the Ubuntu totorial, I shared a link by @jirutka as a template for iptables. It was well formatted and explained the lines/chains well. I had run iptables-save a handful of times, since I had set up my system originally. As such, I lost the beautiful formatting and commenting.
With that said, let's take a look at what our firewall looks like. Run the command sudo iptables -L -v -n --line-numbers.
If your iptables is still formatted per the file by @jirutka, you modify your firewall by editing the saved file: sudo nano /etc/iptables/rules.v4. Under # 2. HOST SPECIFIC RULES, add this line: -A INPUT -p tcp -m multiport --dports 80,443 --syn -m conntrack --ctstate NEW -j ACCEPT. You then have to "restore" the file to your active iptables. Again, these instructions are only if you copied @jirutka's file to rules.v4 (per my Ubuntu install tutorial). If your rules.v4 is not in this format, then skip to the next paragraph.
sudo -i
iptables-restore < /etc/iptables/rules.v4
exit
If you want to add the line direclty to iptables and not use the template, here's a brief explanation. I refer you back to how your firewall looks after running sudo iptables -L -v -n --line-numbers. We will be adding the line to the iptables INPUT chain, after the first several lines. These lines up top are to allow loopback traffic, allow anything related to traffic initiated by the server and deny/drop specific type of traffic.
When you ran the iptables list command, notice Chain INPUT and column num. Use the appropriate line number based on the above discussion and review of your iptables.
For more information on iptables, here's a primer at TecMint. Let's assume we need to add the new rule at line 9. Let's breakdown a few of the command parameters. The -I INPUT 9 tells iptables to insert a line in the INPUT chain at the ninth position; -p tcp says it is tcp traffic; -m multiport --dports 80,443 says traffic can go to either 80 or 443 ports. The rest of the command tells iptables to allow or accept new tcp traffic and allow kernel-level connection/state tracking.
sudo iptables -I INPUT 9 -p tcp -m multiport --dports 80,443 --syn -m conntrack --ctstate NEW -j ACCEPTNow is a good time to remind you. Always make frequent backups, and rename your backups so you don't replace an essential backup. For example, sudo cp /etc/iptables/rules.v4 /etc/iptables/rules.v4.bak.[date] and sudo iptables-save.
Test unencrypted web server
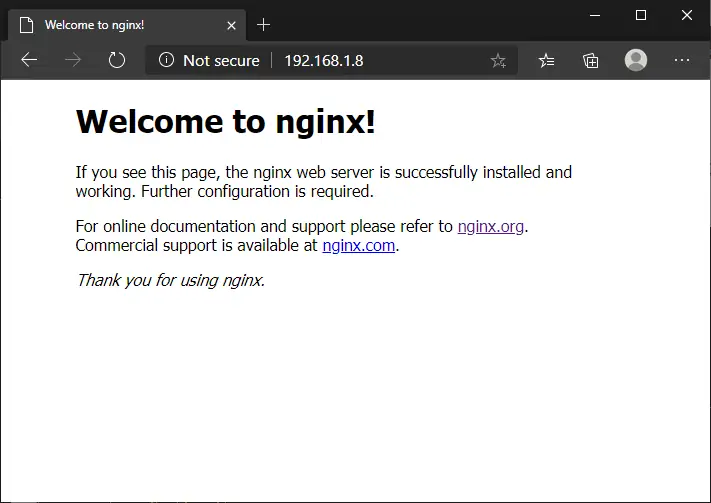
Now that the Nginx web server is running and the iptables firewall allows http traffic, let's test it out. In your browser, go to http://domain.com or http://[ip address] (using your own domain name or ip address).
Now try going to https://domain.com (notice the s in https and use your own domain name) to see how the browser treats encrypted traffic without a valid certificate. Not good, ya? Well, let's fix that.
Certbot - Let's Encrypt - TLS
Encrypted web traffic is the standard now. It used to be cost-prohibitive for smaller operations and hobbyists. A team of non-profits partnered together to help us all out with free (or donation supported) verified TLS certificates. This is all thanks to Let's Encrypt, ISRG and Certbot via Electronic Frontier Foundation. So, if you have the means, go ahead and give a tax-deductible donation to one or all of these non-profit organizations.
Set up the certbot repository and install the package.
sudo apt install software-properties-common
sudo add-apt-repository universe
sudo add-apt-repository ppa:certbot/certbot
sudo apt update
sudo apt install certbot python-certbot-nginx
Certbot renews their certificates relatively frequently. There are several methods for you to implement to allow this to happen in the background. I'll show you the webroot method.
Create the "hidden" folder that will have the webroot file available for certbot to find.
sudo mkdir -p /usr/share/nginx/html/.well-known/acme-challenge
sudo chown -R www-data:www-data /usr/share/nginx/html
If unsure if you you set this up correctly, then test it out. Make a simple html file, e.g., sudo nano /usr/share/nginx/html/.well-known/acme-challenge/test.html.
<h4>Header</h4>
<p>This is a test paragraph.</p>
Go to a web browser and test it out: http://[host.domain.com]/.well-known/acme-challenge/test.html. If it loads correctly, go ahead and delete this test file: sudo rm /usr/share/nginx/html/.well-known/acme-challenge/test.html.
I will create certificates for the following hosts (or subdomains) along with the primary domain. These will include www.domain.com, domain.com and host.domain.com. Again, replace your own host and domain names, but would definitely include www as one of your subdomains. In the command below, the trailing \ tells Ubuntu bash that the command continues to the next line. Answer any prompts that come up.
sudo certbot certonly --webroot \
-w /usr/share/nginx/html -d www.domain.com -d domain.com -d host.domain.com
Certbot package installer set up automated certificate renewals. However, your services on the server that rely on the TLS certificate need to know whenver a new one is loaded. We will take advantage of the "hooks" used by certbot when certificates are renewed.
The following command will force the certificate to be renewed and also add the hook to the automated process in the future. It will also test to make sure the webroot set up above works.
sudo certbot renew --force-renewal --deploy-hook "service nginx reload"Your Let's Encrypt/Certbot TLS certificates are saved in /etc/letsencrypt/live/www.domain.com/ folder. This is as long as you wrote the www subdomain first when you created the certbot certificate initially.
Nginx - TLS configuration
Now that we have our own verified TLS certificates, we have to tell our Ubuntu services that they can now use them. Let's start by enhancing the security of the certificates by creating a Diffie-Hellman group. The following command will take several minutes.
sudo openssl dhparam -out /etc/ssl/private/dhparam.pem 4096
...
...
...
sudo chmod 600 /etc/ssl/private/dhparam.pem
Now let's edit the Nginx configuration file. I based my TLS cipher suite used by Nginx on the file they keep up to date on github. The link breaks sometimes. You can always find it by Binging for the keywords github certbot options ssl nginx conf. Copy the contents of github file. Create the nginx TLS/SSL configuration file: sudo nano /etc/letsencrypt/options-ssl-nginx.conf. Paste the contents of the github file into the editor.
We will redirect all traffic except for certbot webroot verification from unencrypted http traffic to encrypted https. We'll also forward encrypted traffic to domain.com over to www.domain.com. This keeps things consistent and minimizes duplicate search results. If you prefer forwarding www subdomain traffic to your primary domain, then do the opposite. Again, fill in your own information in the example below. It will not work if you leave it as domain.com.
sudo nano /etc/nginx/conf.d/default.conf
server {
  listen 80;
  listen [::]:80;
  server_name www.domain.com domain.com host.domain.com xxx.xxx.xxx.xxx [ffff:eeee:dddd::1234];
  location ^~ /.well-known/acme-challenge/ {
    default_type "text/plain";
    root /usr/share/nginx/html;
  }
  location / {
    return 301 https://www.domain.com$request_uri;
  }
}
server {
  listen 443 ssl http2;
  listen [::]:443 ssl http2;
  server_name domain.com name.domain.com;
  ssl_certificate /etc/letsencrypt/live/www.domain.com/fullchain.pem;
  ssl_certificate_key /etc/letsencrypt/live/www.domain.com/privkey.pem;
  ssl_trusted_certificate /etc/letsencrypt/live/www.domain.com/chain.pem;
  ssl_dhparam /etc/ssl/private/dhparam.pem;
  ssl_stapling on;
  ssl_stapling_verify on;
  include /etc/letsencrypt/options-ssl-nginx.conf;
  return 301 https://www.domain.com$request_uri;
}
server {
  listen 443 ssl http2;
  listen [::]:443 ssl http2;
  server_name www.domain.com;

  ssl_certificate /etc/letsencrypt/live/www.domain.com/fullchain.pem;
  ssl_certificate_key /etc/letsencrypt/live/www.domain.com/privkey.pem;
  ssl_trusted_certificate /etc/letsencrypt/live/www.domain.com/chain.pem;
  ssl_dhparam /etc/ssl/private/dhparam.pem;
  ssl_stapling on;
  ssl_stapling_verify on;
  include /etc/letsencrypt/options-ssl-nginx.conf;

  root /usr/share/nginx/html;
  index index.html index.php;

  location / { try_files $uri $uri/ =404; }
}
Test encrypted web server
And voila. In your browser type in http://domain.com, replacing your own domain name and using unencrypted http on purpose. If you want, press F12 before going to your site. You can then see how the initial requests are ultimately forwarded to the encrypted https port and virtual host server_name www.domain.com.
Once other apps are installed on the server, we can modify the steps above to create other virtual hosts. For example, we can direct mail.domain.com to Dovecot, Postfix and Webmail services; drive.domain.com to a file sharing service; and db.domain.com to a web interface to manage your database (e.g., phpmyadmin).
Next step is to complete our modified LEMP stack by adding a database service and server side scripting. In the next blog ...